Showing posts with label Weekend Project. Show all posts

Saturday, May 2, 2015

Weekend Project #6 DIY Spring Canvas Art


I am so excited to be sharing this! I had a sudden urge to paint a spring themed canvas and I'm really proud of how it turned out! I thought I share a little tutorial so you can try it out too. I think this will really brighten up and room and any mood. If you try it out, let me know, as I'd love to see recreations.


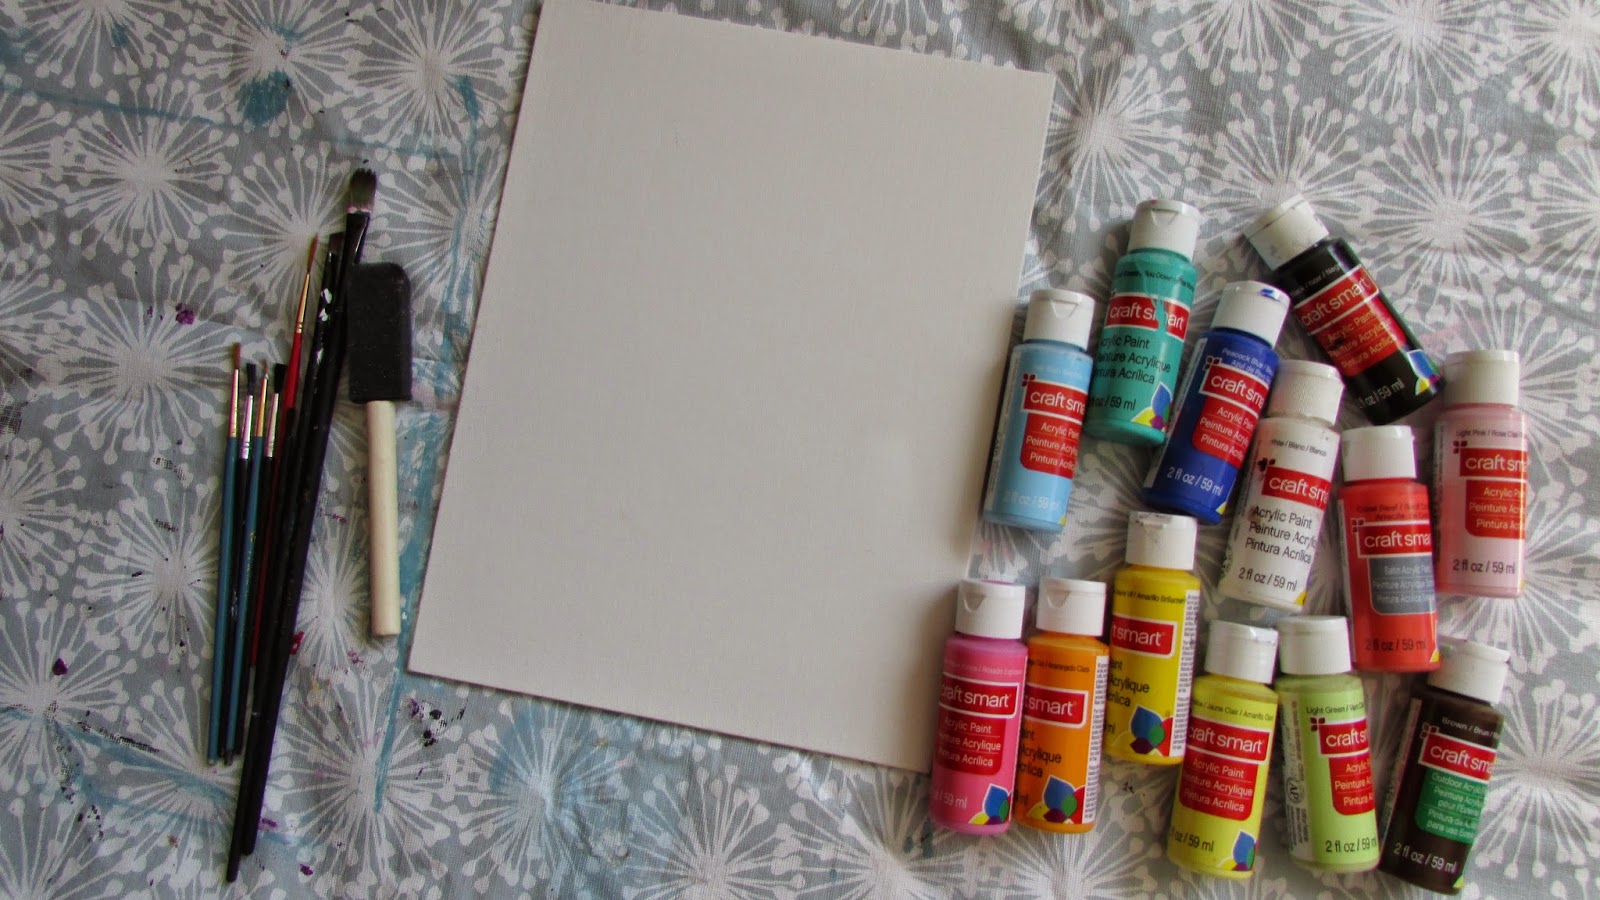
 You only need a blank canvas, paints of your choice and a few brushes.


 I started by choosing 3 blue paints and creating an ombre background for the floral design. I think the blue really makes the floral pop, and adds a ton of extra color. You could leave it like this and it would look great too. You can really stop and any of the steps and it would look  just as amazing. I just wanted to go for extra detail. 


 These were the paints I used if you were wondering!


 Next I took a white paint and just free handed some flowers. No matter what. I think it will turn out great. Even if you don't thin you're artsy (I'm definitely not that skilled) whatever you paint will have personality. Even if you think you messed up, keep going it will all turn out in the end! Again, leaving it like this would be beautiful!


 I used white underneath so that the colors would pop. Then I went in with some super bright shades to fill in all but 2 of the flowers, as I wanted a couple of daisy-like flowers.


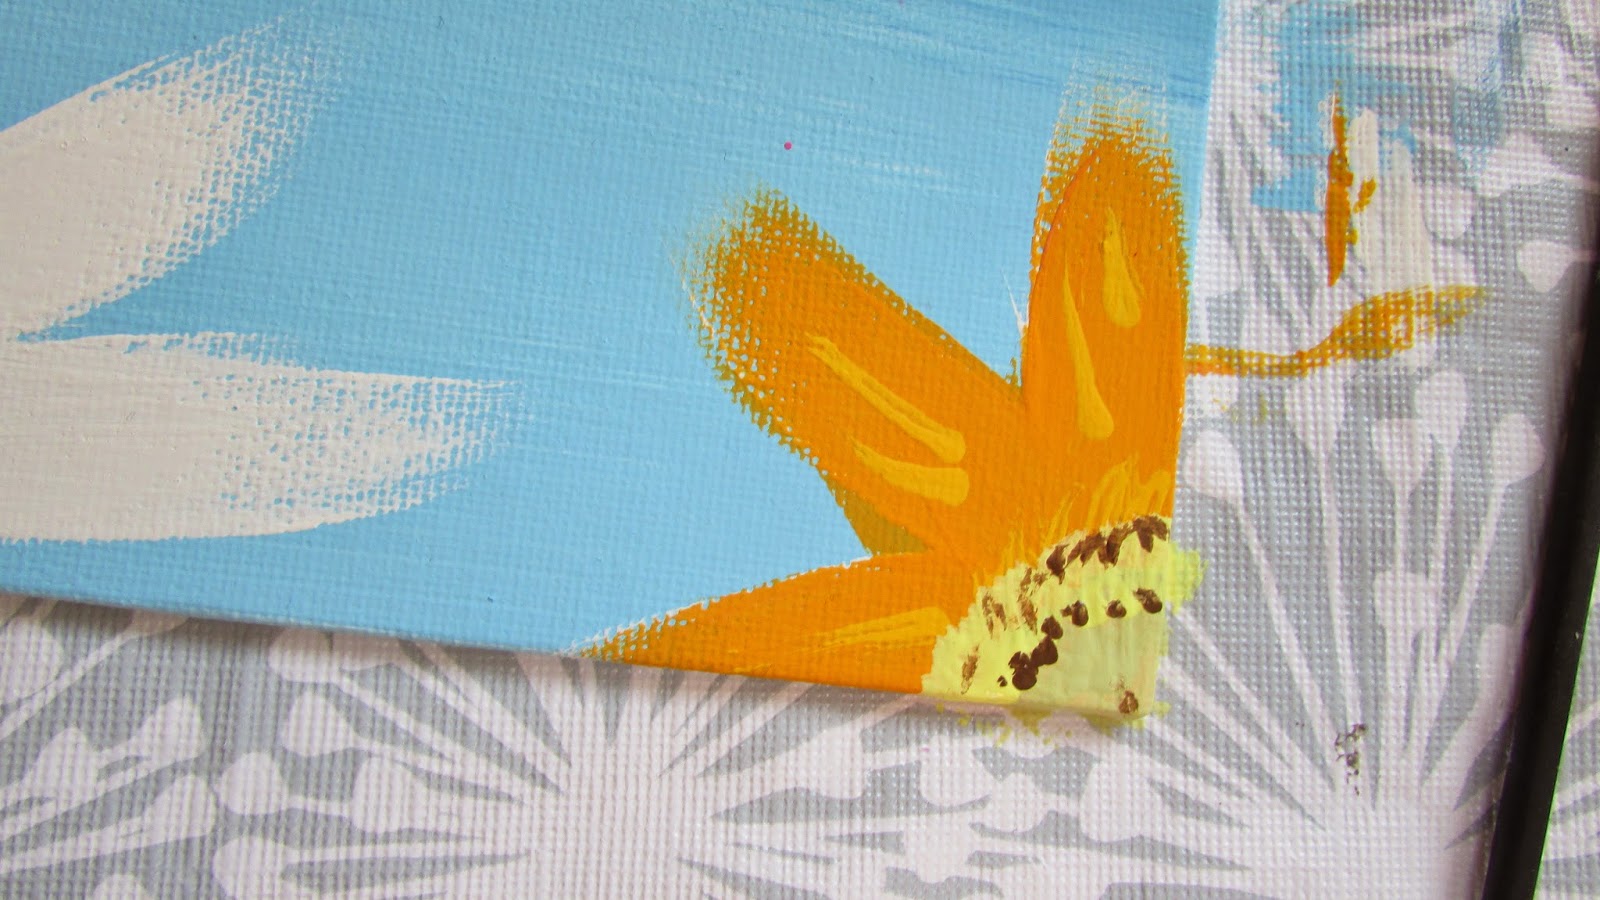
 Of course, I had to add the yellow center to the daisies.


 To add a bit of dimension, I mixed up some of the shades so I had the same color in a darker shade. I went in and did a bit of "shading" on the flowers.


 Finally, I filled in the centers with various colors, alternating the order, and added some brown spots.


I really love the finished look! It didn't turn out as I expected, but I think I prefer it that way.

I hope this gives you a little something to do this weekend!

Saturday, March 28, 2015

Weekend Project #5 DIY Jewelry dish


I have had so much fun with my Weekend Projects in the past, I just had to do another one! This week's project is a DIY Jewelry Dish.It's really chic and customizable to match any bedroom. It's super simple to make so I would definitely recommend trying it out! It's not just for jewelry, you could store anything you'd like in it!
Enjoy :)


 Some supplies you will need are:

-A bowl or dish (I found mine at the grocery store)
-Rubbing alcohol (for best paint adhering) 
-Paint of your chosen colors
-Paint brushes
-Varnish (optional)
-Washi tape &/or anything else to decorate (optional)
 
 
 I had this bowl lying around for quite a while and it seemed so boring. I decided to jazz it up a bit with some paint! You can really use any dish you'd like. 
First, I quickly wiped down the bowl with rubbing alcohol, to make sure the paint would stick.
 
 
I then went in with a gold acrylic paint. Don't worry if it looks awful on the first coat. I think mine took about 4 or 5 coats to get to my desired opacity.


Once the outside had dried, I moved onto the inside. For the inner portion of the bowl, I chose a pale pink acrylic paint.  This one took about 2 to 3 coats.
Since this paint has a matte finish, I went over it with a varnish to give a glossy shine. This step is optional, but I think it really pulls the whole thing together.


And that's it! If you'd like, you can decorate it with anything else but I decided to keep it plain. This is a great organizing piece for any room.

That's all for this DIY, have an amazing weekend!

Saturday, February 7, 2015

Weekend Project #4 DIY Heart canvas


I wasn't really planning on doing a Valentine's Day themed post this year. I didn't really want to do food again, since I did that last year. However, I stumbled upon this DIY canvas on Pinterest and knew I had to make it! This isn't only perfect for Valentine's Day, you could have it up year round. It's so simple and fun to make!


Materials:

Canvas of choice size
Various sized branches
Paint brushes
Paint of choice
Hot glue gun & glue


1. Paint your canvas your color of choice! I chose this pale pink paint by craft smart.

2. Cut your twigs according to the shape. I did a heart, but you could really do any shape!

3. When the canvas is completely dry, glue down the twigs in your desired shape with the hot glue.

5. Let it dry and you're done!

6. I chose to paint the edges as well, as I find it looks a bit cleaner.


I love the 3D look of this canvas!

Alright, That's about it. I hope you try this out & let me know if you do! :)

Saturday, December 20, 2014

Blogmas 2014: Day 20 ~ Weekend Project #3 DIY Coasters


Here is my 3rd and final Weekend Project of Blogmas! I have really enjoyed this little series and can see myself continuing on with this in the new year. Anyways, I hope you enjoy this last little DIY. It's a very affordable DIY that costs under $5 for 4 coasters! I found this 4 pack of cork coasters at IKEA for only $2! And the rest of the supplies, I already had on hand! Enjoy!


The first idea, is a painted polka dot coaster.

Supplies:
Large sticker/drawer liner
Paint brushes
Acrylic paints
Hole punches (various sizes)
1 cork coaster

All you need to do is..
Trace the coaster on the drawer liner. Cut the shape out, then hole punch the cut-out with various sizes. Peel off the back and apply to the coaster. Paint in the dots with as many colors as you'd like. Allow to dry and peel of the sticker.
As you can see, I kinda messed up on one of the dots, but oh well!


This next one is even easier and I can easily say this one is my favorite of them all! 

Supplies:
Regular tape
White acrylic paint
Paint brush
1 cork coaster

Apply the tape in even stripes onto the coaster. Paint over with the white paint and allow to dry. Peel of the tape and you're done!


I didn't get many photos of this since I did it at night in terrible lighting. Anyways, it's fairly easy to explain.

Supplies:
Mod Podge (I made my own with 1 part white glue, 1 part water)
Printed off photos in the shape of your coaster
Paint brush
Cork Coaster

Print out the photos of your choice and cut the out in the shape of your coasters. Apply 1 layer of Mod Podge onto the coaster and apply the picture. Let dry then apply another coat on top. When dry, Apply 1 more coat if desired, and your done! The coasters bend a bit, so put them under a heavy book to flatten them out.


That's all for this weekend's project! I hope you try it out and enjoy the weekend!

Saturday, December 13, 2014

Blogmas 2014: Day 13 ~ Weekend Project #2 DIY Christmas card ideas


I've got another project for you guys do do this weekend! Since there's only about 12 days 'till Christmas, I thought I'd share some DIY card ideas! I made 3 cards and they are all VERY simple to make a require very little supplies.
Enjoy :)


This first card is a simple hand-drawn snowflake! Feel free to switch out the message or even leave it plain! All you do for this card is use a ruler to draw a few lines creating a snowflake and ecorate as desired!


This next card is a very unique snowman cutout card! All you do for this is cut out 3 different sized circle as well as a top hat to create the snowman. Then line the inside of the card with a different color and decorate your snowman!


This last card is probably the easiest! All you've got to do is draw a zig-zag pattern, roughly in the form of a tree, add a star and a cute message!

Those are all of the cards. I really love making handmade cards since I feel like they're a bit more special to give!

Saturday, December 6, 2014

Blogmas 2014: Day 6 ~ Weekend Project #1 DIY Nail Polish Racks


I have been wanting to get his up for quite a while now! I decided for the weekends leading up to Christmas I'd do a Weekend Project! I will be showing you 3 projects to keep you busy during the weekends leading up to Christmas. They won't all be Christmas themed however they could all be made as gifts or just for yourself! Today's project is a DIY nail polish rack. I've struggled to store my nail polish for years now and I've finally found the solution! 

These racks are made for less than $10 each and are super easy to make! I found some plain spice racks from IKEA and put my own twist on them!

Materials:

Paint of choice


I couldn't get a good photo of the package but I found these in the kitchen section of IKEA for only $6.99 each! You can make 3 personalized nail polish racks for under $30!


These were the paints I chose. The silver craft spray paint worked the best. The Krylon Satin spray paint in nickel worked well too however the Krylon Dual Gold spray paint was awful! It was streaky and the color was completely uneven after 3 coats. I painted over with a gold acrylic paint instead. I can't remember where the craft paint if from but the Krylon ones are from Walmart. The Nickel paint was $2 and the Gold was closer to $8. 


I feel like this DIY shouldn't even be a DIY since it's so easy and you're simply just assembling the spice rack, painting it, and hanging it on the wall. 
Lay out some newspaper and spray the racks in thin, even coats (after assembling them) until opaque. I did this in my garage since the scent is very potent.  
I did one coat of silver, 2 of nickel and as I said 3 of gold followed by repainting with acrylic. 
Let them dry for at least 24 hours before using them.


After that, hang them on your wall! I had some assistance hanging them on the wall and I filled them up with nail polish!

I really love the way these turned out and they look very simple in my busy room!


I hope you enjoyed this DIY and I hope you try it out!