Showing posts with label Home. Show all posts

Wednesday, July 15, 2015

DIY Summer room decor! (part 2)


Here is my DIY Summer room decor part 2! I have 4 more fun and easy room decor ideas for the Summer. I found a lot of inspo from Pinterest and I would totally recommend browsing for even more DIYs! I hope you try these out!

DIY POPSICLE GARLAND 


 Supplies:
Colored craft paper
Washi tape
Double sided tape
Popsicle sticks
Hot glue
String/yarn/ribbon
Any other decorating supplies


1. Draw a popsicle shape freehand or print out a stencil. I went freehand.
2. Cut out your shape and use it as a stencil for the rest of your popsicles. I made 5.
3. Cut out your shapes.
4. Decorate your popsicles as desired. I used craft tape, colored paper and a sharpie.
5. Glue the stick on the back of the "popsicles" then glue the popsicles 2-3 inches apart on a long piece of string.

This is a super cute DIY. You can see the garland better in the very first photo.

WATERCOLOR CANVAS


Supplies:
Blank canvas
Water
Paint brushes
Watercolor paints
Paper towel & surface to mix paints on
Sharpie (optional)


1. Pour out some of your favorite paint colors onto a dish. I used a plastic lid.
2. Dip your paintbrush in a cup of water.
3. Pick up a small amount of the watercolor paint.
4. Paint your desired design on the canvas. I chose to make a bunch of abstract swirls. Browse Pinterest and other sights for inspiration.
5. Feel free to mix colors to create new shades.
6. Continue with your design until desired look is compltely.

Remember, more water less paint!


I took inspiration from this site!


I love this cool tones of this piece!

DIY GOLD GLITTER VASE 


Supplies:
Glass vase
Paint brush
Gold paint
Gold glitter
Rubbing alcohol


1. Pour gold paint into vase
2. Add glitter
3. Tip upside down until paint slides down vase in your desired pattern.
4. Let dry overnight or until completely dry.
5. Fill with flowers or anything else!

Again, you can see the finished product in the very first photo! I chose to add sunflowers!

PEEK-A-BOO WASHI TAPE DOOR


This one is super simple! All you've gotta do is tape the inside of your door. It's invisible when closed but adds a nice pop of color when open.

That's all for the second part of my DIY Summer room decor! I hope you enjoyed.

Sunday, July 12, 2015

DIY Summer room decor! (part 1)


Hello! I found a ton of inspiration for some DIY room decor on Pinterest and I just had to share my favorites! All of these DIYs are super Summer-y, easy and fun to make! I definitely hop you try them out. This is part 1 and part 2 will be coming super soon.

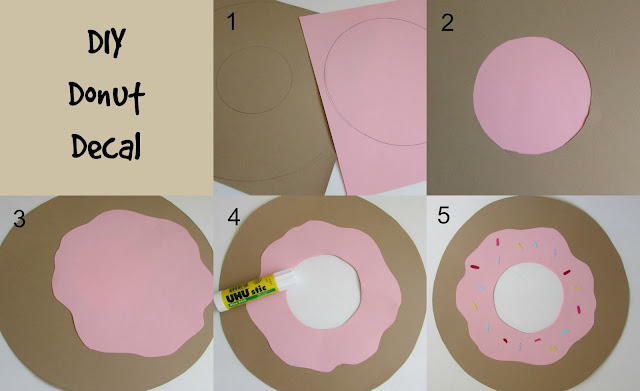
DIY DONUT DECAL


 Supplies:
Beige and Pink (or desired color) scrapbook paper
Various color scrapbook paper scraps
Scissors
Glue
{Round objects to trace & pencil}


 1. Trace 2 circles on beige paper, and one circle on pink paper and cut them out. The beige paper is the donut and the pink is the frosting.
2. Trace the donut hole onto the frosting paper so that they two holes line up.
3. Cut out a wavy pattern around edge of pink circle to resemble frosting.
4. Match up the two donut holes, and glue the pink paper over the beige.
5. Cut out and glue con various colored sprinkles.


DIY WATERMELON JAR


 Supplies:
Mason Jar
Watermelon colored paint
Sharpie
Green ribbon
Hot glue
Paint brushes
Rubbing alcohol and cotton

 
1. Wipe down your jar with rubbing alcohol to ensure that your paint will stick.
2. I had to mix some shades to create my desired pink/coral.
3. Pour the paint inside the jar and paint the entire surface. If you'd prefer a matte finish, paint the outside of the jar. Once it's dry, paint another layer until opaque. Let dry completely.


4. Draw on some little oval shapes to resemble seeds with a black sharpie.
5. Glue on green ribbon around the mouth of the jar with a hot glue gun.


And you're done! Feel free to fill with flower, makeup brushes or whatever else you desire!

DIY WASHI TAPE DOOR STOP


 Supplies:
Washi tape
Door stop
Scissors


 All you have to do it cut out your washi tape to fit the door stop and arrange it how you like!
I think this looks a lot cuter than a boring plastic door stop.

 
I originally planned to do all of my DIYs in one post but there were too many! Look out for Part 2 coming this week!

Monday, April 20, 2015

Surviving Spring Cleaning


Spring Cleaning season is upon us and it can be super difficult to get motivated. I thought I'd share some tips on how make it a little more survivable. These definitely help me since I don't even really mind cleaning my room anymore. Hope it helps! :)


Throw away 1 thing a day
Start off small by only throwing out 1 thing per day. Choose an area of your room and pick something to get rid of (or donate of course!).

Devote 1 day to cleaning
I like to do this once in a while, usually on Sundays. I like to dedicate 1 whole day to cleaning. it makes me feel super productive. 

Play some music
I'm sure you all know this, but playing your favorite music helps the cleaning process a ton!

Fuel up
Make some fun snacks and don't forget to eat throughout the day! Sometimes when I clean for long periods of time, I kind of forget to eat which can really make you less energized.
Treat yourself
After you're done (or during) cleaning, have a treat or pamper yourself a bit. Do whatever makes you feel good!

Take breaks
This is majorly important! You need to take breaks, they are the perfect opportunity to treat yourself!

Make it fun
 If you love organizing, organize all of your stuff. Coordinate cleaning with something you enjoy.

Find a friend
 Ask a friend to hangout with you while you clean, it will make it a lot more fun and time won't pass as slowly.

Don't get distracted
 I often get distracted by little memories and what not. Try to put them aside to look at another time so that you don't end up getting distracted from cleaning.

Get comfy
Put your hair up and throw on some super comfy clothes to make it a little more enjoyable.

Make it therapeutic
It can be really therapeutic for me to take time to myself and clean. Taking time to yourself in general is quite therapeutic.

Keep your stuff close and your garbage closer
Okay, well that was cheesy... Anyways, keep a garbage can super close so you don't have to keep getting up and going to the trash. 

I hope this helps your spring cleaning go a little smoother!


Saturday, February 7, 2015

Weekend Project #4 DIY Heart canvas


I wasn't really planning on doing a Valentine's Day themed post this year. I didn't really want to do food again, since I did that last year. However, I stumbled upon this DIY canvas on Pinterest and knew I had to make it! This isn't only perfect for Valentine's Day, you could have it up year round. It's so simple and fun to make!


Materials:

Canvas of choice size
Various sized branches
Paint brushes
Paint of choice
Hot glue gun & glue


1. Paint your canvas your color of choice! I chose this pale pink paint by craft smart.

2. Cut your twigs according to the shape. I did a heart, but you could really do any shape!

3. When the canvas is completely dry, glue down the twigs in your desired shape with the hot glue.

5. Let it dry and you're done!

6. I chose to paint the edges as well, as I find it looks a bit cleaner.


I love the 3D look of this canvas!

Alright, That's about it. I hope you try this out & let me know if you do! :)

Saturday, December 20, 2014

Blogmas 2014: Day 20 ~ Weekend Project #3 DIY Coasters


Here is my 3rd and final Weekend Project of Blogmas! I have really enjoyed this little series and can see myself continuing on with this in the new year. Anyways, I hope you enjoy this last little DIY. It's a very affordable DIY that costs under $5 for 4 coasters! I found this 4 pack of cork coasters at IKEA for only $2! And the rest of the supplies, I already had on hand! Enjoy!


The first idea, is a painted polka dot coaster.

Supplies:
Large sticker/drawer liner
Paint brushes
Acrylic paints
Hole punches (various sizes)
1 cork coaster

All you need to do is..
Trace the coaster on the drawer liner. Cut the shape out, then hole punch the cut-out with various sizes. Peel off the back and apply to the coaster. Paint in the dots with as many colors as you'd like. Allow to dry and peel of the sticker.
As you can see, I kinda messed up on one of the dots, but oh well!


This next one is even easier and I can easily say this one is my favorite of them all! 

Supplies:
Regular tape
White acrylic paint
Paint brush
1 cork coaster

Apply the tape in even stripes onto the coaster. Paint over with the white paint and allow to dry. Peel of the tape and you're done!


I didn't get many photos of this since I did it at night in terrible lighting. Anyways, it's fairly easy to explain.

Supplies:
Mod Podge (I made my own with 1 part white glue, 1 part water)
Printed off photos in the shape of your coaster
Paint brush
Cork Coaster

Print out the photos of your choice and cut the out in the shape of your coasters. Apply 1 layer of Mod Podge onto the coaster and apply the picture. Let dry then apply another coat on top. When dry, Apply 1 more coat if desired, and your done! The coasters bend a bit, so put them under a heavy book to flatten them out.


That's all for this weekend's project! I hope you try it out and enjoy the weekend!

Sunday, December 7, 2014

Blogmas 2014: Day 9 ~ Holiday Room Decor Ideas & DIYs


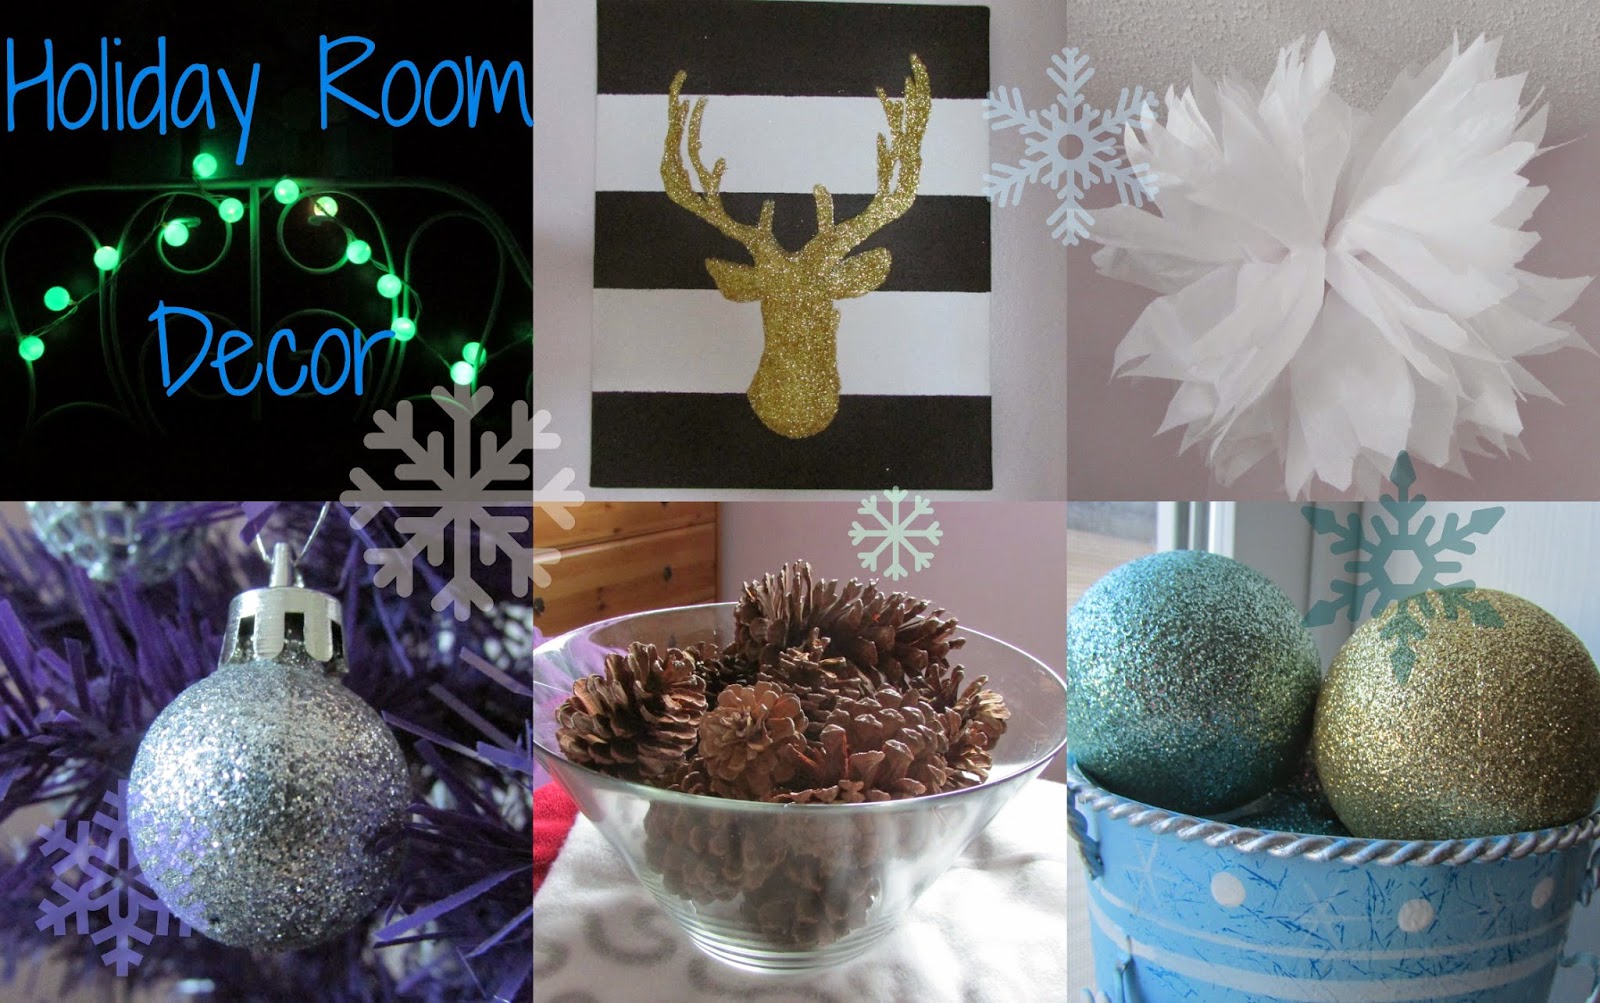
My room is finally decorated for the Christmas season! I went for more of a simple colored theme with a lot of metallics and neutrals colors. I found a ton of inspiration on Pinterest and dug out some decor from past years. I've got a couple of DIYs and a few other ideas for decorating, Enjoy!


I found this idea from Pinterest and it's super easy to re-create! 

1. Measure even stripes with painters tape on a canvas.
2. Paint over it with a black acrylic paint until opaque & allow to dry.
3. Remove tape and trace a deer head template over the stripes. (I found mine on Google, sized it, printed it and cut it out).
4. Fill in the traced shape with white glue or mod podge.
5. Quickly sprinkle gold or silver glitter over the entirety of the shape.
6. Shake off excess glitter after 30 seconds or so and repeat until the glitter is opaque. (I had to do this a few times)
7. Spray the glitter with sealant or hairspray to prevent fallout.
You're done!


I also found this idea on Pinterest for these tissue paper pom poms. These look spectacular in my room and they're so unique & easy!

1. Fold 5-10 sheets of tissue paper in an accordion style (back & forth). More sheets = more full.
2. Tie the center together with string .
3. Cut each end into a triangle shape.
4. Spread the layers of tissue paper to reveal a full pom pom.
5. Hang wherever you please!


The last DIY is SO easy yet so interesting. These Ping Pong ball lights look really cool and unique!

1. Cut a small "x" shape in each ping pong ball with an x-acto knife
2. Slide each light bulb into the "x" shape

I didn't have enough ping pong balls for every light bulb however I put them on all of the lights over my bed and it still looked great!

Here are some more decor ideas!


 Cute pail with some Target ornaments.


Ikea candy cane place mat.


 Target candy dish for hair accessories.


 Mini tree


Target Pails filled with ornaments and nail supplies.


 Cinnamon-scented pine cones from target in a large IKEA bowl.


I threw a couple of winter-y blankets onto my bed.
Red: Costco 
White & Gray: IKEA


Large dollar store candy cane at the entrance of my bedroom.

I hope you were able to gather some inspiration from this! Enjoy the rest of your Sunday! :)